
In this article we look at how to modify the @wordpress/scripts build tools to customise your Gutenberg development experience.
Configuring your own JS development environment & build processes can be daunting to those who aren’t familiar with doing so. The introduction of the Gutenberg editor in WordPress represents a seismic shift in the way that plugins and themes are written. This shift has divided opinions and even created anger amongst those who see this step as another barrier to entry.
Here at Negative Space Studios we have fully embraced the shift to the new editing experience and are thoroughly enjoying the extra power the new editor provides us as developers.
With that said, initially configuring our plugin build processes to be able to develop custom Gutenberg blocks and take advantage of the new toolset was a challenging step – until we discovered @wordpress/scripts.
Introducing @wordpress/scripts
The WordPress core development team created @wordpress/scripts with the specific function of simplifying and standardising development for the Gutenberg editor.
The package provides everything you need to get up and running with creating your own custom Gutenberg blocks. It also eliminates the need to configure your own Webpack & Babel build processes to get started.
This is a collection of reusable scripts tailored for WordPress development. For convenience, every tool provided in this package comes with an integrated recommended configuration.
WordPress.org
This “integrated recommended configuration” of build tools is exactly what we want for the development of Gutenberg blocks. However, what happens when you need to modify the base configuration to fit with the rest of your plugin structure?
In this article we’ll show you how to modify the @wordpress/scripts configuration to use a different plugin development setup. We’ll also use it to compile your plugin’s front-end JS and CSS.
Modifying the default Webpack configuration
This is the default setup that the @wordpress/scripts package expects for it to be able to compile your Gutenberg blocks:
/src
 --index.js
 # JS Entry point for Gutenberg block code
/build
 # Compiled Gutenberg block code is output here
While the structure above is great for practising the development of Gutenberg blocks, it may not be the structure you want for your plugin.
To show you how to modify the default configuration to better suit your plugin structure, we’ll go through a simple setup exercise to create a plugin that has a more complex folder structure. We’ll also set it up so that it compiles scss to CSS for your front-end assets.
Our desired folder structure will look like the following:
/my-gutenberg-block-plugin
 --/assets
    # The output folder for our front-end assets
    --/css
 --/blocks
    --/src
       # Our entry point for Gutenberg blocks
    --/build
       # Our compiled Gutenberg block code
 --/scss
    # Our entry point for front-end scss
Go ahead and create a new plugin folder on your development machine that uses the structure outlined above.
Please note: from this point onwards this article assumes that you are familiar with developing using Node.js and package managers. If you are unfamiliar with these topics, please see the JavaScript Build Setup section of the WordPress Block Editor Handbook.
Once the desired folder structure has been created, navigate to the root /my-gutenberg-block-plugin folder in your terminal / command line program and run the following command:
NPM:
npm initYarn:
yarn initThe above commands when run create a package.json in your plugin folder. The init command asks a few simple questions about your project and uses your answers to create the file.
With our package.json file created, let’s go ahead and add the @wordpress/scripts package to our project:
NPM:
npm install @wordpress/scripts --save-dev --save-exactYarn:
yarn add @wordpress/scripts --dev --exactThe above commands will create a node_modules folder inside your plugin folder and import all of the package’s scripts. The --dev / --save-dev flags let your project know that this is a development dependency and that the code contained in the package is only used as a development tool. This means that you do not want the code the package contains compiled & bundled along with your final release code.
The --exact / --save-exact flags tell yarn / npm to download an exact version of the package. By default, the package manager software will list a package version in your package.json as being suitable for use as long as it is above a certain version number.
This can sometimes lead to incompatibilities if you come back to your project in the future and re-install your packages. You might receive a version that is no longer compatible with your own code.
For this example I have chosen to freeze the version number as the version that was available when I started the project. This gives me complete control over deciding when to update the build tools at a later date and fix any incompatible code.
Your package.json file will now have the @wordpress/scripts package listed as a development dependency:
{
  "name": "nss-block-pack",
  "version": "1.0.0",
  "description": "Collection of custom Gutenberg blocks for the Negative Space Studios website",
  "main": "index.js",
  "repository": "git clone git@bitbucket.org:negativespacestudiosdevelopers/nss-block-pack.git",
  "author": "Negative Space Studios <team@negativespacestudios.com>",
  "license": "GPL-2.0-or-later",
  "private": true,
  "devDependencies": {
    "@wordpress/scripts": "12.5.0"
  }
}
Adding the build scripts
In order to use the tools provided by the package, we’ll need to list some build scripts that can be triggered from the command line to compile our code and assets. The @wordpress/scripts package provides a number of ready-to-go build scripts that perform many different tasks (full list here). For our project we’ll be concentrating on the build and start scripts used to compile our code and assets.
To add the scripts to your project you’ll need to list them in your package.json file like so:
{
  "name": "nss-block-pack",
  "version": "1.0.0",
  "description": "Collection of custom Gutenberg blocks for the Negative Space Studios website",
  "main": "index.js",
  "repository": "git clone git@bitbucket.org:negativespacestudiosdevelopers/nss-block-pack.git",
  "author": "Negative Space Studios <team@negativespacestudios.com>",
  "license": "GPL-2.0-or-later",
  "private": true,
  "devDependencies": {
    "@wordpress/scripts": "12.5.0"
  }
,
  "scripts": {
    "build": "wp-scripts build",
    "start": "wp-scripts start"
  }
}
The “scripts” object shown above tells our project to run wp-scripts build or wp-scripts start when the corresponding commands are entered into our command line interface.
NPM:
npm run buildYarn:
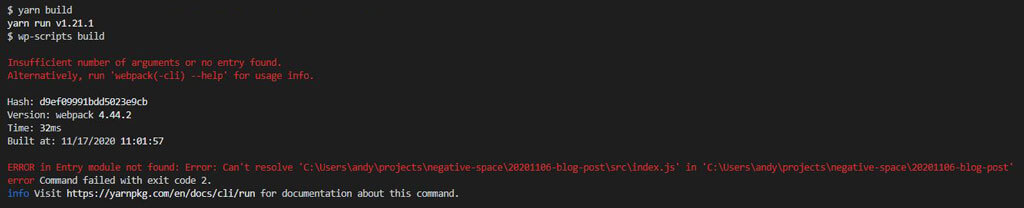
yarn buildTrying to run a build process right now will more than likely throw an error. This is because the scripts will not be able to find any code in your project.
The @wordpress/scripts package provides a number of ways you can modify the scripts provided to cater for different entry points and modify the output path of your files.
The simplest of these methods is by adding options as arguments that are then passed to the default wp-scripts build script in your package.json file:
{
    "scripts": {
        "build": "wp-scripts build",
        "build:custom": "wp-scripts build entry-one.js entry-two.js --output-path=custom"
    }
}
Adding the above to your package.json file would allow you to run a new process called “build:custom” which would take the listed project entry points into account and save the resulting bundles to the folder defined as --output-path.
However, this not ideal for our use case as we do not want the same output path for our front-end & back-end assets. Ideally we want these two to be split into our desired folder structure.
Modifying webpack.config.js
To do this, we’ll need to provide our own webpack.config.js file to override the default configuration included with the @wordpress/scripts package.
Let’s go ahead and create a webpack.config.js file and add it to our project’s root folder. We’ll fill our new config file with the following information:
/**
 * WordPress dependencies
 */
const defaultConfig = require( '@wordpress/scripts/config/webpack.config' );

/**
 * Local dependencies
 */
const path = require( 'path' );

module.exports = [
    {
        ...defaultConfig,
        entry: {
            blocks: path.resolve( process.cwd(), 'blocks/src', 'index' )
        },
        output: {
            filename: '[name].js',
            path: path.resolve( process.cwd(), 'blocks/build' )
        }
    }
];
Let’s go through what each part of the above configuration code does. Firstly we bring in the default @wordpress/scripts webpack configuration file from the package directory in the node_modules folder.
/**
 * WordPress dependencies
 */
const defaultConfig = require( '@wordpress/scripts/config/webpack.config' );
We save the above configuration file output to a constant which we can later use when providing our own configuration overrides.
Next, we bring in the path utility that comes with Node.js as standard to help us define our absolute folder paths.
These paths will form our entry and output folders based on the current working directory.
/**
 * Local dependencies
 */
const path = require( 'path' );
The path.resolve() method provided by Node.js as standard will construct our folder paths for us. When combined with the process.cwd() method to retrieve the path of the current working directory for the Node.js process this will return absolute folder paths to the correct folders within our project directory.
We’re going to use the above to modify the entry and output locations that the Webpack build process will use. The next part of the code exports our customised webpack configuration.
module.exports = [
    {
        ...defaultConfig,
        entry: {
            blocks: path.resolve( process.cwd(), 'blocks/src', 'index' )
        },
        output: {
            filename: '[name].js',
            path: path.resolve( process.cwd(), 'blocks/build' )
        }
    }
];
Inside the module.exports declaration we export an array of our customised configurations for Webpack.
If we were only making one configuration change then we could just export a single configuration object instead of an array of objects.
As we will be adding a second configuration for our front-end asset bundle, we’re exporting an array.
Each configuration object in the array represents a single bundle that Webpack will create when we come to build our project assets. This allows us to compartmentalise the front-end & back-end code bundles we want to create for our plugin.
The configuration we have just created does the following:
- It uses the spread operator to copy in the default WordPress configuration provided by @wordpress/scripts. This means that the build process retains all of the plugin and module setup options that allow successful Gutenberg block creation to occur.
- It changes the default entry point which Webpack will use when looking for the code that creates our Gutenberg blocks.
- It changes the default output path for the resulting bundled files. The filename for the generated bundle is defined by the entry point. In this case the generated file will be called
'blocks.js'as that is the entry point name we have defined.
Testing our modified Gutenberg block Webpack configuration
At this point we should go ahead and test that the above configuration modifications have the desired effect. To do this we need to add one more file, the index.js file for our blocks that will act as our entry point.
Go ahead and create an index.js file in your blocks/src folder.
/blocks
    --/src
       index.js
It doesn’t really matter at this point what’s included in your index.js file. Eventually this will contain the code responsible for registering your custom Gutenberg blocks with WordPress. We’ll be writing a number of articles covering block construction, but for now we just want to test our configuration. Here’s what we’ve put in ours:
console.log('silence is golden');Re-running your npm run build or yarn build process should now trigger Webpack to generate some output files.
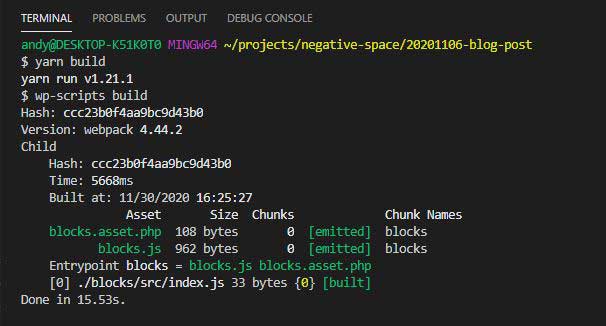
As you can see from the screenshot above, the Webpack build process has generated a blocks.js file and blocks.asset.php file in our blocks/build directory!
If all you want to do is generate custom Gutenberg blocks for your plugin, this setup will be all you need to get started writing your block code.
Use the register_block_type PHP function attached to the init WordPress hook to register your built blocks.js custom script as the editor_script for your block. This will load your script on the WordPress back-end and make your script code run in the editor.
Adding a second Webpack process to compile our SCSS code to CSS
The next thing we want to do is use our custom configuration to compile some SCSS to regular CSS and generate a front-end stylesheet.
To do this, we are going to add a second configuration to our webpack.config.js file that will handle the compilation and generation of our CSS file.
First step is to add a few new Node.js modules & plugins to our setup. These extra resources will handle our SCSS compilation.
Using npm install or yarn add, we’re going to add the following packages:
NPM:
npm install --save-dev --save-exact mini-css-extract-plugin webpack-fix-style-only-entries sass sass-loader postcss postcss-loader postcss-preset-env css-loader webpack@4.44.2Yarn:
yarn add --dev --exact mini-css-extract-plugin webpack-fix-style-only-entries sass sass-loader postcss postcss-loader postcss-preset-env css-loader webpack@4.44.2Here’s a brief description of what each of these packages does:
- Mini CSS Extract Plugin – Webpack plugin that extracts CSS into separate files as part of the build process. This enables us to create standalone CSS files from our build process.
- Webpack Fix Style Only Entries – Webpack plugin that allows our build process to use a Sass file as the entry point. By default Webpack will generate a JS file as part of the build process. We don’t need this file as all we want is our compiles front-end CSS.
- Sass – A pure JavaScript implementation of Sass using Dart Sass. If you’re not familiar with Sass it’s well worth checking out. It adds some great features such as the use of variables, nesting rules and modularising your CSS (Sass) build files by splitting them into separate files that are then compiled during the build process.
- Sass Loader – Loads a Sass/SCSS file into your Webpack process and compiles it to CSS. Needed to compile Sass using Webpack.
- PostCSS – PostCSS is a tool for transforming styles with JS plugins. We’re going to use it to process our CSS rules and add style prefixes automatically to rules that need them. This ensures the greatest browser support for our CSS.
- PostCSS Loader – Webpack loader required to use PostCSS
- PostCSS Preset Env – Default configuration for PostCSS. Adds common rulesets for CSS compilation including Autoprefixer.
- CSS Loader – The Webpack
css-loaderinterprets@importandurl()likeimport/require()and will resolve them. - Webpack – This package has already been installed as a dependency of the @wordpress/scripts package. However, it’s also good to have it listed as a dependency in our own package.json file, so we add it again here. This ensures that should the @wordpress/scripts dependency be removed in future, our custom Sass compilation would still work. I have fixed the version number to be the same as the version @wordpress/scripts previously downloaded so as not to use a later version of Webpack and potentially run into compatibility issues. You can find the version that @wordpress/scripts has currently installed by looking in your own
node_modules/webpack/package.jsonfile and checking the version number. For me it’s 4.44.2, so I added that exact version by adding webpack@4.44.2 to list of modules to add.
The above may seem like a lot to add to your project. In the end it’ll give you a fantastic Sass compilation environment for your plugin.
Configuring our SCSS to CSS build process
Once you’ve added the necessary modules to your project, you’ll need to configure your new build process to use the new tools.
Amend your webpack.config.js file add the following to the ‘Local Dependencies’ section we created before:
/**
 * Local dependencies
 */
const path = require( 'path' );
const MiniCSSExtractPlugin = require( 'mini-css-extract-plugin' );
const FixStyleOnlyEntriesPlugin = require( 'webpack-fix-style-only-entries' );
const postcssPresetEnv = require( 'postcss-preset-env' );
The above will bring in the Mini CSS Extract Plugin, Fix Style Only Entries Plugin and PostCSS Preset Env code ready for use inside your Webpack configuration file.
Next, add the following second configuration object to your module.exports array:
{
        mode: 'production',
        entry: {
            'blocks-style': path.resolve( process.cwd(), 'scss', 'index.scss' )
        },
        output: {
            filename: '[name].js',
            path: path.resolve( process.cwd(), 'assets', 'css' )
        },
        module: {
            rules: [
                {
                    test: /\.(sa|sc|c)ss$/,
                    use: [
                        MiniCSSExtractPlugin.loader,
                        {
                            loader: 'css-loader',
                            options: {
                                url: false,
                                sourceMap: true,
                                importLoaders: 2
                            }
                        },
                        {
                            loader: 'postcss-loader',
                            options: {
                                sourceMap: true,
                                postcssOptions: {
                                    plugins: () => [
                                        postcssPresetEnv( { browsers: 'last 2 versions' } )
                                    ]
                                }
                            }
                        },
                        {
                            loader: 'sass-loader',
                            options: {
                                sourceMap: true,
                                sassOptions: {
                                    outputStyle: 'compressed'
                                }
                            }
                        }
                    ]
                }
            ]
        },
        plugins: [
            new FixStyleOnlyEntriesPlugin(),
            new MiniCSSExtractPlugin({
                filename: '[name].min.css'
            })
        ]
    }
Let’s go through the above configuration and see what each part does.
Firstly, we have told Webpack to run this configuration in ‘production’ mode. Webpack comes with a number of built in optimisations that only run when in production mode.
As we are generating a compiled CSS file from our SCSS files, that is by definition a file that will be used as part of finished ‘production’ rather than ‘development’ code.
Here’s Webpack’s simple explanation:
Providing the mode configuration option tells webpack to use its built-in optimizations accordingly.
webpack.js.org
Next we add our SCSS entry file as our entry point. We once again use the path.resolve() and process.cwd() methods to obtain our absolute folder paths. In this case we are looking for the file index.scss inside the scss directory:
entry: {
    'blocks-style': path.resolve( process.cwd(), 'scss', 'index.scss' )
}
Now we set the output path for our resulting build files. You can see that the output object has a filename setting that would indicate that the build process is meant to be creating a JS file. Happily the Fix Style Only Entries Plugin makes sure that this file is never generated as part of the process.
output: {
    filename: '[name].js',
    path: path.resolve( process.cwd(), 'assets', 'css' )
},
We have to keep this filename setting in the output object otherwise the plugin does not work as expected and an unnecessary JS file is created.
The filename for the file that’s being created is actually set in the Mini CSS Extract plugin.
Again we set the output path using the helpful path and process methods so that our compiled CSS is saved in our assets/css directory.
We now need to configure the rules that are applied to any files we pass to this build process.
Webpack uses the rules object to test each file that has been included using any import, @import, require statements that may be present in your files using your entry point as the starting file.
In the case of your SCSS files, this means it will include any files referenced in your index.scss file using the @import statement and try and apply a corresponding rule to that file.
As we are only processing SCSS, CSS etc. files as part of this process, we need to configure a ruleset that tells Webpack what to do with these files.
module: {
    rules: [
        {
            test: /\.(sa|sc|c)ss$/,
            use: [
                MiniCSSExtractPlugin.loader,
                {
                    loader: 'css-loader',
                    options: {
                        url: false,
                        sourceMap: true,
                        importLoaders: 2
                    }
                },
                {
                    loader: 'postcss-loader',
                    options: {
                        sourceMap: true,
                        postcssOptions: {
                            plugins: () => [
                                postcssPresetEnv( { browsers: 'last 2 versions' } )
                            ]
                        }
                    }
                },
                {
                    loader: 'sass-loader',
                    options: {
                        sourceMap: true,
                        sassOptions: {
                            outputStyle: 'compressed'
                        }
                    }
                }
            ]
        }
    ]
},
The test: /\.(sa|sc|c)ss$/ setting tells Webpack to apply the following process to any files that have a file extension matching .sass, .scss or .css respectively. The use setting then tells Webpack to apply the following modifications to these files as part of the process by using Webpack loaders.
Webpack loaders
Webpack runs through the use array of processes in reverse order and applies the loaders to the files that matched the rule. This means that the last entry in the array will be the process that runs first. The result of that process will then be passed to the next process in the array.
sass-loader
The first Webpack file loader that runs in our process is the sass-loader. This loads in our scss file, processes the sass code contained inside the file and generates browser readable CSS code.
We have instructed the process that we want to save source map files and that we want to output the result of the sass compilation in the compressed format. This means it will strip out all unnecessary spaces etc. from the generated CSS code.
To see all possible supported sass options, check out the readme provided with the sass-loader package.
postcss-loader
PostCSS is a fantastic tool that applies automatic processing to your CSS code to help make it more cross-browser compliant (amongst other things).
When combined with the equally fabulous Autoprefixer it’ll apply browser specific prefixes to your CSS rules to make sure that the CSS generated has the greatest possible browser support.
We’re once again telling the postcss-loader that we want to generate source maps for our code. We’re also passing in the postcss-preset-env plugin and telling it that we want to support the latest browsers plus the previous 2 versions of each browser.
Autoprefixer will now prefix any CSS rules if it’s necessary for them to run in any browsers that match our ‘last 2 versions’ rule.
To see all possible options that can be passed to the postcss-preset-env plugin, check out their documentation.
css-loader
The css-loader is responsible for loading all of the various files imported using @import rules inside our scss files. Here we’re telling the loader that we want source map files to be generated. We’re also telling it that we want to run the previous two loaders on any files it imports when encountering @import rules.
Finally, we’re telling it to not process url() declarations found within our CSS files as if they were import/require() JS statements. This stops it from rewriting any url() declarations it finds in the code which, depending on your setup, can input incorrect urls for background image file locations. This is because by default it tries to locate the file within the current filesystem and import it. Setting the url setting to false cancels this behaviour.
MiniCSSExtractPlugin.loader
The final loader we apply is part of the MiniCSSExtractPlugin.
By default Webpack wants to generate bundled script files that concatenate all input into JS files to be used with Node.js applications.
This is not the behaviour we want for the front-end assets we want to generate for our WordPress plugin. The MiniCSSExtractPlugin.loader allows us to extract the output generated by the process and create a separate CSS file that can be used on the front-end of the site.
Webpack plugins
Lastly, we have added two plugins to Webpack that modify the final output:
plugins: [
    new FixStyleOnlyEntriesPlugin(),
    new MiniCSSExtractPlugin({
        filename: '[name].min.css'
    })
]
Webpack Fix Style Only Entries plugin
The Webpack Fix Style Only Entries plugin removes the unnecessary JS file that would otherwise be created by our custom build process.
In our output setting we specified the required filename for a JS file that the default process is expecting to create. As we only want to create front-end stylesheets, this process is considered a style only entry process. Therefore the plugin removes the JS file created by Webpack as it is not needed.
Webpack Mini CSS Extract plugin
The Webpack Mini CSS Extract Plugin extracts the CSS generated in our build process out and saves it as a separate file.
The plugin sets the filename for the CSS file that’s been created. This is the file that we want to load as our front end CSS asset for our plugin.
Conclusion
Our method shows you how to modify the default Webpack configuration options included with the @wordpress/scripts package so that it can output other files common in WordPress plugin development.
If you have found our step-by-step useful, feel free to drop us a message and let us know what you’ve created!