Optimising images to improve website performance and speed
One of the most common tasks we get asked to perform at Negative Space Studios is to increase the performance and speed of our clients’ websites to improve their SEO performance.
The web has come a long way in terms of providing developers with tools they can use to compress the size of web pages to make them more performant. The modern browser’s capability to receive data that has been compressed using GZIP for example means that the total amount of data being transferred for each page can be drastically reduced. This leads to better loading times and page performance.
While there are many performance optimisations we can make to a site’s codebase, we often find the simplest and most rewarding place to start is by looking at the size of the media files that have been uploaded to the site.
The problem with images
Conventional image formats such as JPEG & PNG do not benefit much from GZIP compression due to the format of the data that describes the image detail. This means that even if your site’s codebase has been optimised for performance, the use of an overly large image asset on a page can undermine all of the hard work that has been put in to make the site performant.
In this article we look at ways you can reduce the size of your images before uploading them to your site to make sure they don’t have an adverse effect on site performance.
Step 1: Determining the maximum image display size
The first step that should be taken when deciding to upload an image is to determine the maximum size at which that image will be displayed on screen. This can be accomplished using your browser’s inbuilt page inspection tools.
Here’s how to find out the display size of your image using the Google Chrome browser:
Using Chrome’s inspection tools to obtain the ideal image width
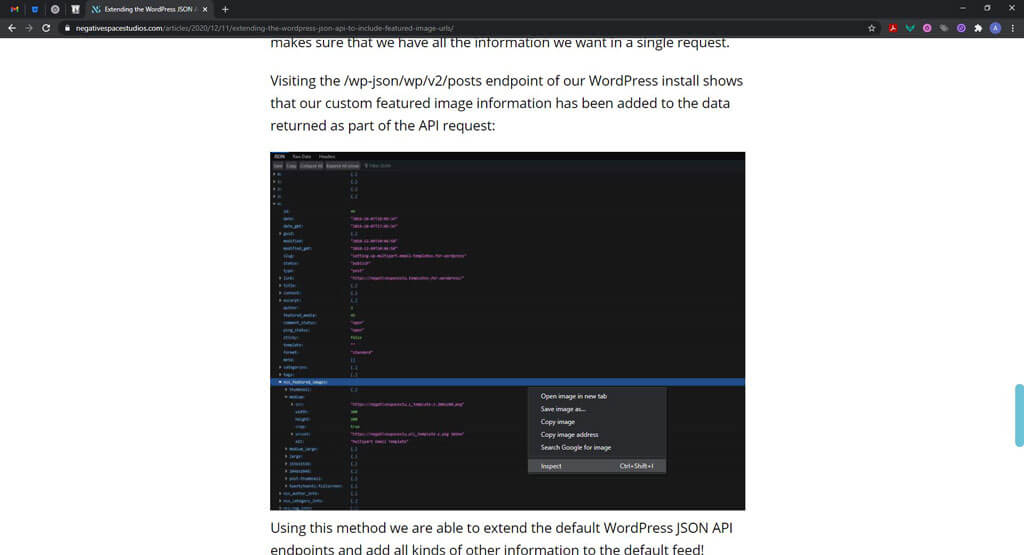
Right click on an image that has been uploaded to your site and click on ‘Inspect’ from the resulting pop-up menu (Figure 1).
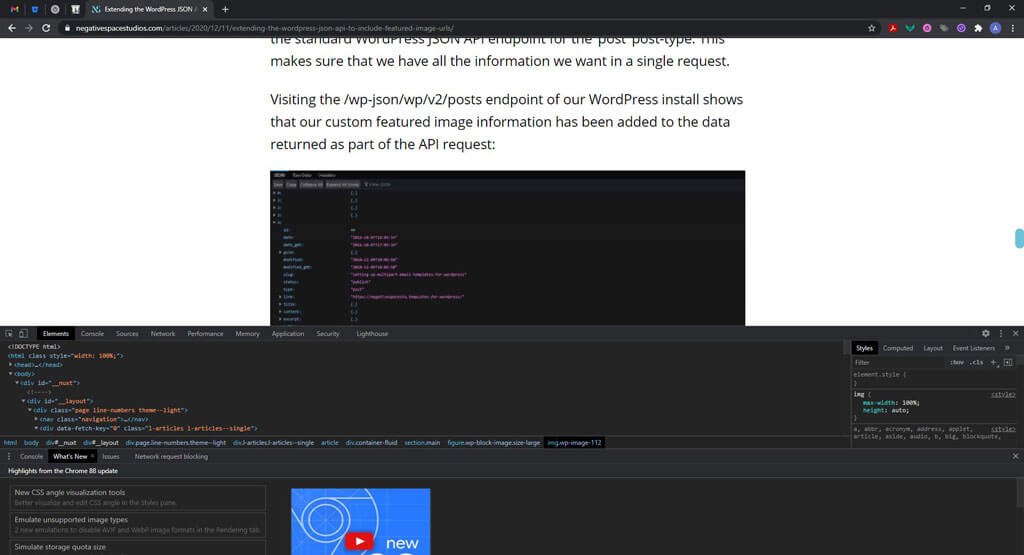
This will open the code inspection window (Figure 2). This inspection window can look a little daunting, but don’t worry. The tools just show you information about your site you wouldn’t otherwise see.
There is a small icon to the top right of the inspection tool window that can be used to highlight and show details about specific areas of the webpage. Hovering over the this tool will display the description ‘Select an element in the page to inspect it’. Go ahead and select this tool by left clicking on it (Figure 3).
With this tool selected, hover over the image on the page to show the display dimensions. This will show the width and height for the area the image is taking up on screen in pixels (Figure 4). This is the information we will use as a basis when scaling our image for performance.
In our example we can see that the image that’s been highlighted has a width value of 890.61px and a height value of 672.3px when viewed on a 1920px width monitor (Figure 5).
Step 2: Using Adobe Photoshop to scale our image for website performance
As we know that our image will be displayed at just a shade under 900px when viewed on a 1920px screen, we can now use Photoshop’s image scaling tools to create an appropriately sized image. We’ll make the image slightly larger than we really need it to be to cater for slightly larger monitor sizes.
Firstly, let’s select an image we want to add to the site. I’m going to add an image of a cute Panda I’ve found on unsplash.com (Figure 6) by a photographer named Bruce Hong.

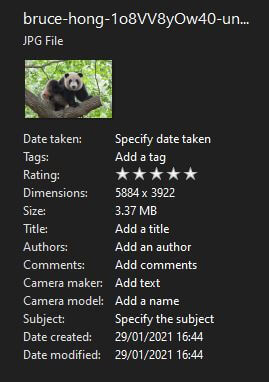
After downloading the full quality image from the unsplash.com website, selecting the image in Windows explorer reveals the image dimensions and file size (Figure 7).
The image we have downloaded for use on our site is far larger than we need. It has a massive file size of 3.37MB and image dimensions of 5884px x 3922px. This image is too large for use on the web and would cause significant slowdown if we uploaded it as it currently is.
To add some context to the effect of the size of the image on site performance, the code responsible for producing the entire negativespacestudios.com homepage is approximately 315kb in size when Gzipped.
From a performance perspective, that means that this one image would be roughly 10x more expensive for the server to serve, and for the web browser to render, than everything else that makes up the rest of the page.
Saving for web in Photoshop
Opening up the original image in Adobe’s Photoshop allows us to use tools that can rescale the image to make it a more suitable size for our use.
Once the image in open in the Photoshop interface select File > Export > Save for web (legacy) from the top navigation bar (Figure 8). This will launch the save for web interface window.
This window allows us to change various image dimension and quality settings to reduce the overall file size (Figure 9).
At the top right hand side of the save for web window you’ll find a dropdown interface next to Preset that allows you to select from some pre-configured quality options to use when exporting your image.
We find the JPEG High setting to offer a good balance between reducing the file size without resulting in a massive reduction in visible image quality (Figure 10).
Next, we want to reduce the overall width of our image so that it’s closer to the size it will be displaying on our page.
As we have a responsive website, we’re going to save the file at a slightly larger width than is actually necessary to cater for those visitors that may be looking at the site on a slightly larger display.
The interface includes a width field that you can adjust to reduce the width of the image. By default, it will scale the image proportionately and automatically reduce the height of the image when you enter a new width (Figure 11).
Underneath the image itself on the left hand side of the interface Photoshop tries to approximate the effect these changes will have on overall download time when the image is displayed in the browser (Figure 12 & 13).
As you can see from the examples, changing the image quality alone would generate a file that, by Photoshop’s estimation, would take 19 seconds to download on a 2 megabyte per second (mbps) internet connection.
Changing both the quality & size of the image results in a image that would take just 2 seconds to download on the same internet connection. That’s a massive reduction and great news for overall page performance.
Once you have finished modifying the settings for your file, go ahead and click save to save the modified image file.
Step 3: Optimising your image further with TinyPNG
There are still further improvements we can make to your image to reduce overall file size. TinyPNG is a great tool that allows you to upload your PNG and JPEG files for further compression.
The TinyPNG software further optimises your image for use on your website by stripping out unnecessary meta information from the image itself and selectively decreasing the number of colours present in the image. The creators say:
By selectively decreasing the number of colors in the image, fewer bytes are required to store the data. The effect is nearly invisible but it makes a very large difference in file size!
Source – https://tinypng.com/
Go ahead and upload the image you have just optimised in Photoshop and let TinyPNG work it’s magic! The resulting minified file is now ready for upload & use on your own website (Figure 14).
In conclusion
Making sure that you only upload images that have been properly scaled for use on your website will have a huge impact on the site’s overall performance.
Correct image scaling comes with a myriad of benefits:
- It reduces the load on your server as it doesn’t have to work as hard to transfer large files to your visitors. This means that your server is able to serve more pages to more visitors with the same resources.
- It reduces the size of each page on your website allowing browsers to render the page information faster.
- It improves your SEO scores potentially leading to a better search engine ranking for your pages as speed and performance are a factor in your overall SEO score.
- It helps to ensure that your pages are able to display even on the slowest of internet connections.
- Lower data transfer equals lower power consumption. This means that you can even boast that your site has become greener too!
We hope that you’ve found this article useful and we’ve made the case for the benefits of using correctly scaled images for performance on the web. Better performance = happier visitors!


